2.1.setup()入口
- 理解:Vue3.0中一个新的配置项,值为一个函数。
- setup是所有Composition API(组合API)“ 表演的舞台 ”。
- 组件中所用到的:数据、方法等等,均要配置在setup中。
- setup函数的两种返回值:
- 若返回一个对象,则对象中的属性、方法, 在模板中均可以直接使用。(重点关注!)
- 若返回一个渲染函数:则可以自定义渲染内容。(了解)
- 注意点:
- 尽量不要与Vue2.x配置混用
- Vue2.x配置(data、methos、computed…)中可以访问到setup中的属性、方法。
- 但在setup中不能访问到Vue2.x配置(data、methos、computed…)。
- 如果有重名, setup优先。
- setup不能是一个async函数,因为返回值不再是return的对象, 而是promise, 模板看不到return对象中的属性。(后期也可以返回一个Promise实例,但需要Suspense和异步组件的配合)
2.2.ref 响应式监听
2.3.reactive与toRefs
2.4.computed的用法
2.5.watch的用法
1
2
3
4
5
6
7
8
9
10
11
12
13
14
15
16
17
18
19
20
21
22
23
24
25
26
27
28
29
30
31
32
33
34
35
36
37
38
39
40
41
42
43
44
45
46
| <template>
count: {{count}}
<button @click="sub">-</button>
{{user.username}} {{user.age}}
<p>doubleCount is: {{ doubleCount }}</p>
</template>
<script>
import {reactive, toRefs, computed,watch} from "vue";
export default {
setup() {
let state = reactive({
count:3,
user: {
username: 'lisi',
age: 20
},
});
newStr: computed(()=>{
return JSON.parse(JSON.stringify(state))
});
watch(()=>state.count, (newVal,oldVal)=>{
console.log(newVal)
return state.count = newVal<=0 ? oldVal : newVal;
})
function sub() {
state.count--;
}
return {
...toRefs(state), sub
}
}
}
</script>
|
2.6.setup()参数
setup() 函数有两个参数:props 和 context。
为什么要有这两个参数呢?我们知道父子组件之间是可以传值。但是现在我们的业务逻辑都写在setup函数中,而setpu中没有this指针,那么就只能靠这两个参数来进行传递了。
props:父组件向子组件传值的参数。
context:子组件向父组件传值的参数。
2.6.1.props参数
setup() 函数的 props 是父组件向子组件传值的参数。
在components文件夹中创建子组件(Hello.vue):
测试:
父组件Home.vue
1
2
3
4
5
6
7
8
9
10
11
12
13
14
15
16
17
18
19
20
21
22
23
24
25
26
27
| <template>
<div>
我是父组件
<Hello :msg="msg" :age="age"></Hello>
</div>
</template>
<script>
import Hello from "@/views/Hello";
import { reactive, toRefs, computed } from "vue";
export default {
setup() {
const state = reactive({
age: 1111,
msg: 'this is props...'
});
return {
...toRefs(state),
};
},
// 注意,要先import导入子组件,然后使用components挂载子组件。
components:{
Hello
}
};
</script>
|
子组件Hello.vue
1
2
3
4
5
6
7
8
9
10
11
12
13
14
15
16
17
18
19
20
21
| <template>
<div>我是子组件</div>
子组件获取到父组件的值: {{msg}} - {{age}}
</template>
<script>
export default {
name: "Hello",
setup(props, content) {
console.log(props.msg)
},
props: {
age: Number,
msg: String
}
}
</script>
<style scoped>
</style>
|
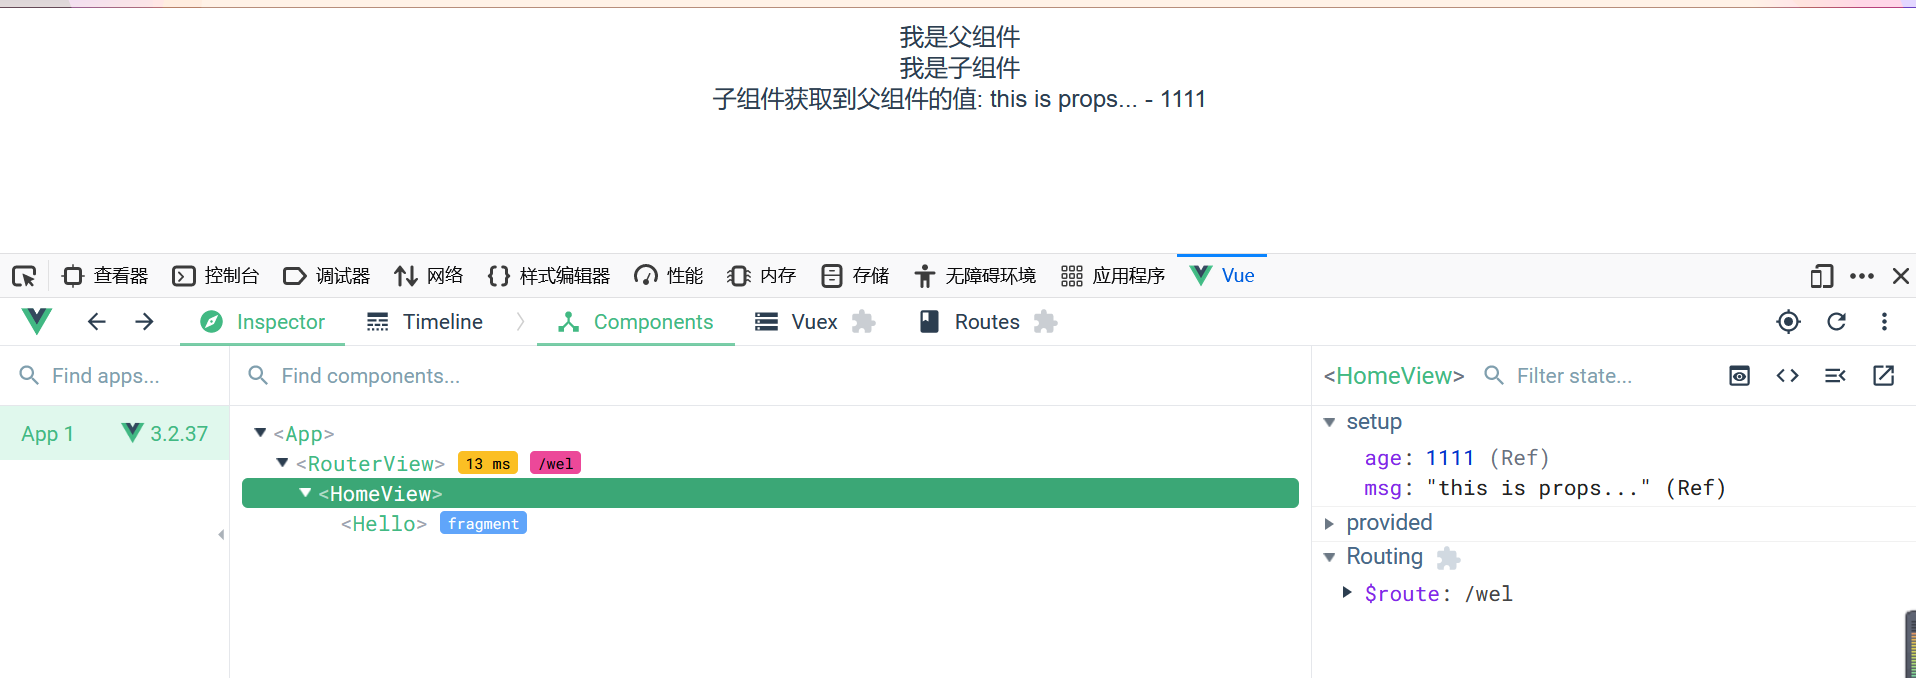
注:在父组件定义的路由可以查看父组件赋值给子组件的数据,但在子组件没数据。组件嵌套
结果截图:
2.6.2 context参数
setup() 函数的 context 是子组件向父组件传值的参数。
父组件homeView.vue
1
2
3
4
5
6
7
8
9
10
11
12
13
14
15
16
17
18
19
20
21
22
23
24
25
26
27
28
29
30
31
32
| <template>
<div>
<Hello msg="hello" @childmsg="get"></Hello>
<p>我是父组件,接受子组件传的值:{{welcome}}</p>
</div>
</template>
<script>
import Hello from "@/views/Hello";
import { reactive, toRefs, computed } from "vue";
export default {
setup() {
const state = reactive({
welcome: ''
});
function get(param) {
state.welcome = param;
}
return {
...toRefs(state),
get
};
},
components:{
Hello
}
};
</script>
|
子组件Hello.vue
1
2
3
4
5
6
7
8
9
10
11
12
13
14
15
16
17
18
19
20
21
22
23
24
25
26
27
| <template>
<div>
<div>我是子组件</div>
<button @click="send">给父组件发数据</button>
</div>
</template>
<script>
export default {
setup(props, context) {
function send() {
context.emit("childmsg", "hello world!");
}
return {
send,
};
},
props: {
msg: String,
},
};
</script>
<style>
</style>
|
2.7 ref函数
作用: 定义一个响应式的数据
语法:
1
| const xxx = ref(initValue)
|
- 创建一个包含响应式数据的引用对象(reference对象,简称ref对象)。
- JS中操作数据:
xxx.value
- 模板中读取数据: 不需要.value,直接:
<div></div>
备注:
- 接收的数据可以是:基本类型、也可以是对象类型。
- 基本类型的数据:响应式依然是靠
Object.defineProperty()的get与set完成的。
- 对象类型的数据:内部 “ 求助 ” 了Vue3.0中的一个新函数——
reactive函数。
2.8 reactive函数
- 作用: 定义一个对象类型的响应式数据(基本类型不要用它,要用
ref函数)
- 语法:
const 代理对象= reactive(源对象)接收一个对象(或数组),返回一个代理对象(Proxy的实例对象,简称proxy对象)
- reactive定义的响应式数据是“深层次的”。
- 内部基于 ES6 的 Proxy 实现,通过代理对象操作源对象内部数据进行操作。
2.9 reactive对比ref
- 从定义数据角度对比:
- ref用来定义:基本类型数据。
- reactive用来定义:对象(或数组)类型数据。
- 备注:ref也可以用来定义对象(或数组)类型数据, 它内部会自动通过
reactive转为代理对象。
- 从原理角度对比:
- ref通过
Object.defineProperty()的get与set来实现响应式(数据劫持)。
- reactive通过使用Proxy来实现响应式(数据劫持), 并通过Reflect操作源对象内部的数据。
- 从使用角度对比:
- ref定义的数据:操作数据需要
.value,读取数据时模板中直接读取不需要.value。
- reactive定义的数据:操作数据与读取数据:均不需要
.value。
在返回时使用 …toRefs(state) ,这样视图层就可以不使用 state 前缀了。
为什么要使用 … 参数扩展运输符呢?因为toRefs(state) 将state对象展开,并包装成多个响应数据。
3.Composition API的使用
下面我们会将前面学过的知识点都改写为Composition API的形式。而且,Vue3兼容Options API和Composition API两种写法。所以这两种写法都要会。
3.1.provide与inject的使用
我们学过provide与inject可用于多级组件直接传递数据,下面学习provide与inject在Composition API中的使用。
示例:
- 创建孙子组件(SubHello.vue)
1
2
3
4
5
6
7
8
9
10
11
12
13
14
15
16
17
18
19
| <template>
<div>
<div>我是孙组件</div>
<p>孙组件接收主组件的数据: {{msg}}</p>
</div>
</template>
<script>
import { inject,ref } from "vue";
export default {
setup(props, context) {
const msg = ref(inject('msg'))
return {msg};
}
};
</script>
|
- 在子组件(Hello.vue)中使用孙子组件
1
2
3
4
5
6
7
8
9
10
11
12
13
14
15
16
17
18
19
20
21
22
23
| <template>
<div>
<div>我是子组件</div>
<SubHello></SubHello>
</div>
</template>
<script>
import SubHello from "@/views/SubHello";
export default {
setup(props, context) {
return {};
},
components:{
SubHello
}
};
</script>
<style>
</style>
|
- 在父组件中使用provide给多级组件传值
1
2
3
4
5
6
7
8
9
10
11
12
13
14
15
16
17
18
19
| <template>
<div>
<Hello></Hello>
</div>
</template>
<script>
import Hello from "@/views/Hello";
import { provide } from "vue";
export default {
setup() {
provide('msg','hello');
},
components:{
Hello
}
};
</script>
|
结果截图:

3.2.vue生命周期的用法
在 setup () 内部调用生命周期钩子:
| 选项式API |
setup () 内部调用生命周期钩子 |
| beforeCreate() |
setup() |
| created() |
setup() |
| beforeMount() |
onBeforeMount() |
| mounted() |
onMounted() |
| beforeUpdate() |
onBeforeUpdate() |
| updated() |
onUpdated() |
| beforeUnmount() |
onBeforeUnmount() |
| unmounted() |
onUnmounted() |
注意:在Composition API中没有beforeCreate()和created()这里两个声明周期函数了,统一使用setup()。
3.3.编程式路由的使用
App.vue
1
2
3
4
5
6
7
8
9
10
11
12
13
14
15
16
17
18
19
20
21
22
23
24
25
26
27
28
29
30
31
32
33
34
35
36
37
38
39
40
41
| <template>
<nav>
<button @click="toHome">Home</button>
<button @click="toAbout">About</button>
</nav>
<router-view />
</template>
<script>
import { useRouter } from "vue-router";
export default{
setup() {
const router = useRouter();
function toHome(){
router.push('/');
}
function toAbout(){
router.push({
path:'/about',
query: {
age: 22
}
}
);
}
return {
toHome,
toAbout
}
},
}
</script>
|
AboutView.vue
1
2
3
4
5
6
7
8
9
10
11
12
13
14
15
16
17
18
19
20
| <template>
<div>
</div>
</template>
<script>
import { useRoute } from "vue-router";
export default {
name: "AboutView",
setup(){
const route = useRoute();
console.log(route.query.age);
}
}
</script>
<style scoped>
</style>
|